Today I am so excited to share with you a gift I put together last spring for end of year teacher gifts. I have a huge love for rolled paper flowers, so I decided to mix them with pencils to make an adorable and useful little pencil bouquet, perfect for teachers. I am going to show you how you can make them too!

This project was super inexpensive and with the help of my Silhouette, it was relatively quick and easy! So today I’m going to share with you how I put these puppies together and then I have a little cutting file freebie for you to use on your own rolled flowers. For the flowers above I used a few different rolled flower cutting files I found in the Silhouette Store (there are lots, just search the term “rolled flowers” here). However, for the sake of this post, we will keep it simple. So I made a little freebie that you can download and use yourself to make your own rolled flowers free!
Once you have your file downloaded, head over to your silhouette and cut out a few of them – I recommend using colored card stock for these pretty little puppies. (If you’ve never cut SVG files on your Silhouette I’d recommend hitting up Google, there are a bunch of tutorials out there, leave me a comment though if you’d like to see some specific Silhouette how-to’s on my blog and I’ll make it happen). After you have a handful of flower spirals and leaves ready to go, follow the tutorial below to turn them into a pretty pencil bouquet!
Rolled Flower Pencil Instructions
Supplies Needed:
- Unsharpened pencils (I liked the simple yellow ones, but you could find green ones if you are wanting to make them look like stems)
- Rolled paper flower and leaf cut out (if you don’t have a silhouette, just cut a few pieces of paper into simple spiral circles and you can make them that way instead.)
- Hot glue gun and hot glue (you may want to find the cool temp stuff because you are 99.9% likely to get it on your fingers.)
- Floral tape (washi would probably work too.)
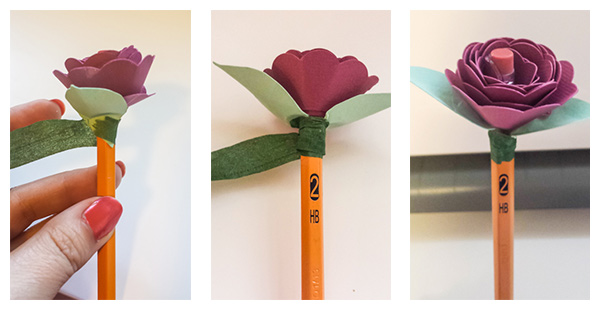
Step 1:

Use hot glue to attach the outer end of the spiral to the metal part of the pencil. The scalloped edge of the flower should be pointing up. Make sure you use enough glue that it is stuck on there completely.
Step 2:
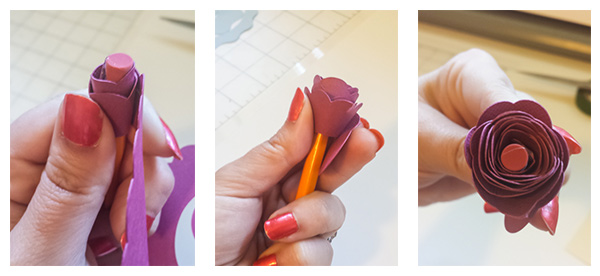
Now roll roll roll that paper around the pencil, keep your fingers on the paper as you roll to make sure it stays tight enough and doesn’t fall down the pencil. When you have the paper all rolled around it you can lose your fingers a little bit to allow the spiral to unravel just a little… you still want a tight roll, but you also want to let the flower get a little volume. This is something you will get a feel for as you make more of them, there is really no wrong way or too loose or too tight, so just let it go as much as feels right to you and you’ll be a pro before you know it. Make sure not to let go completely or your spiral will unravel and you’ll have to re-roll it all up.
Step 3
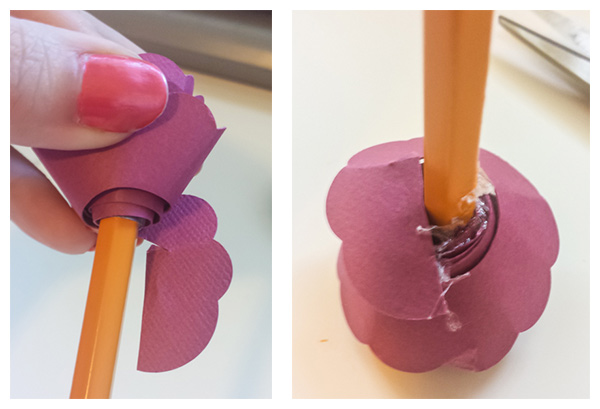
To me, this is the hardest part. You are going to flip your flower over and use the middle of your spiral as the base of your flower, because it is on a pencil you may want to cut the circle of the base in half like i did here, otherwise, you just have to fold half of it down against the pencil. Now you are going to use a good glob of hot glue between the flower and the base. You have to put the glue on and then push everything into place while the glue is hot, warning, it may burn your little finger tips if any glue squeezes out the edges and gets on your fingers. Be brave! Usually, around heavy crafting time my little fingers are pretty red and blistered, I’m sure my finger prints will never be the same. However, these little flowers are crazy cute, sometimes you have to suffer for your art! After the glue sets, your flower should feel totally set in place, if you find any parts of it feel loose, go use glue on the bottom some more to stabilize it. You can always use the leaves (see next step) to help with that step too.
Step 4:
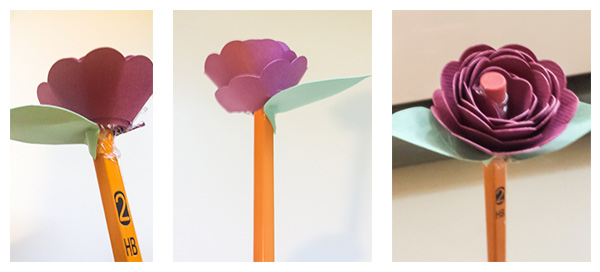
Use hot glue and attach leaves to the pencil right beneath the flower. Fold the bottom of the leaf down to against the pencil it self, and remember you can add a little glue to the bottom of your flower right above where the leaf will go here too, to make everything secure. Just make sure the glue is at the base of the leaf and not showing from the top of the flower. I like to fold and unfold my leaves one time in half lengthwise before I glue too, so that the leaf has a bit of shape to it when you glue it down.
Step 5:
This is the easy part, just take your floral tape and wrap it around your pencil at the base of the flower, right below the leaves. This tape isn’t sticky, but it sort of sticks to itself, so once you twist it around once it will stay in place. I like to use the tape to cover the base of the leaves and try to hid any hot glue that is showing. Once your tape is in place just rip it off and then smooth it down on top of itself and it will stay in place.
Now just repeat this as many times as you’d like, I recommend a zillion, because I feel like you can never have too many paper flowers!!! After I finished all of my flowers I divided them into three smaller sized mason jars and put little bows and little tags with the teacher’s names. They were absolutely darling when I was through!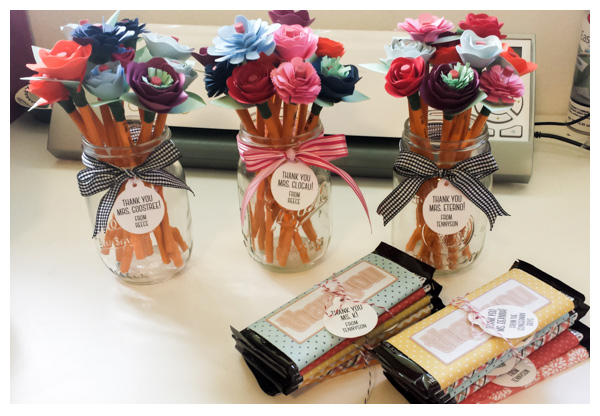
For the school staff, I added in a few of my free “thank you” candy bar wrappers and I had myself a really affordable set of crafty gifts that showed our thanks with out breaking the bank. With Christmas just around the corner, you could do all red, or all red and green flowers and them spray them with a glitter spray and they will be totally holiday ready! You can also use anything you would like for your stem, maybe use chopsticks and then you have a hostess gift instead of a teacher gift. I’ve made paper bouquets out of straws too, but hot glue can melt straws so that one has a lot of potential for disaster!
What do you think? If you make some of these I’d LOVE to hear how it goes for you! Nothing could make me happier than the idea of my little rolled flowers out there in the universe making brightening people’s days! I hope this is helpful to you and that you silhouette users enjoy your cut files! More from me later this week so come back soon!
<3 Shawna
Hi, I really liked the rolled flowers you made and got very excited about your free cutting file – HOWEVER I was disappointed when I downloaded the link – and unzipped the file – there was no SVG cutting file included??? was this an error or has something happned to the link???? Can I pleae – pretty please- ask if you could send me a new link? Sue
SO sorry about that Sue! I found the file on my computer and re-uploaded with the SVG included! Thank you so so much for the kind comment and for letting me know so I could get that fixed up! You can just re-download from the link about and it should be all fixed up!
Thank you so much for sharing your file.
Thank you so much for the file download ! I appreciate it so much that you are willing to share your talent.!